Microsoft says Windows 11 is the most secure Windows yet, but that tag comes at a price. After spending a few weeks in beta, Windows 11 was released on October 5. It’s a free upgrade, but the catch here is that the free upgrade is available to a lot fewer devices than the Windows 10 free upgrade was. Microsoft has made the eligibility criteria for Windows a lot stricter with this one.
Luckily, there are ways to install Windows 11 on unsupported hardware. It requires you to bypass the security and hardware requirement checks in Windows 11. This means that you will essentially be losing some of the promised safety appeal that Microsoft is promising here. However, if you really, badly want to upgrade to Windows 11, it’ll do the trick. Here’s how to install Windows 11 on unsupported hardware.
What you need to know before you install Windows 11 on unsupported hardware
Microsoft has been back and forth about the minimum system requirements that a system will need for Windows 11. There was a backlash against the original system requirements, and Microsoft then loosened them a little bit and revealed that it will not prevent you from installing Windows 11 on unsupported hardware. However, that comes with an asterisk.
Related: The complete Windows 11 installation guide
Microsoft has an official support page that details its stance on installing Windows 11 on unsupported hardware. First of all, there are possible compatibility issues. Windows 11 is still very early and hasn’t been tested enough to determine if there will be any crippling compatibility issues if you run it on unsupported hardware. It is safe to assume that this is a potential problem you may face. Microsoft also says that if you install Windows 11 on unsupported hardware, your system loses the guarantee of system updates, including but not limited to security updates.
How to install Windows 11 on unsupported hardware
Note: The method below works by modifying the Windows 11 ISO to remove security checks. Microsoft does not recommend you do this. It may render your system inoperable, so make sure you have backups, and have understood the risks to your software, data, as well as hardware, before proceeding further. Note that despite using this method, you may not be able to install Windows 11 on your system. The method can bypass some security checks, and it will even let you install Windows 11 without TPM. However, some other requirements, like having a 64-bit CPU, cannot be bypassed.
Microsoft has a PC Health Check App, which you should download and run. The app confirms whether your system is incompatible with Windows 11, and lists out the components responsible for the ineligibility.
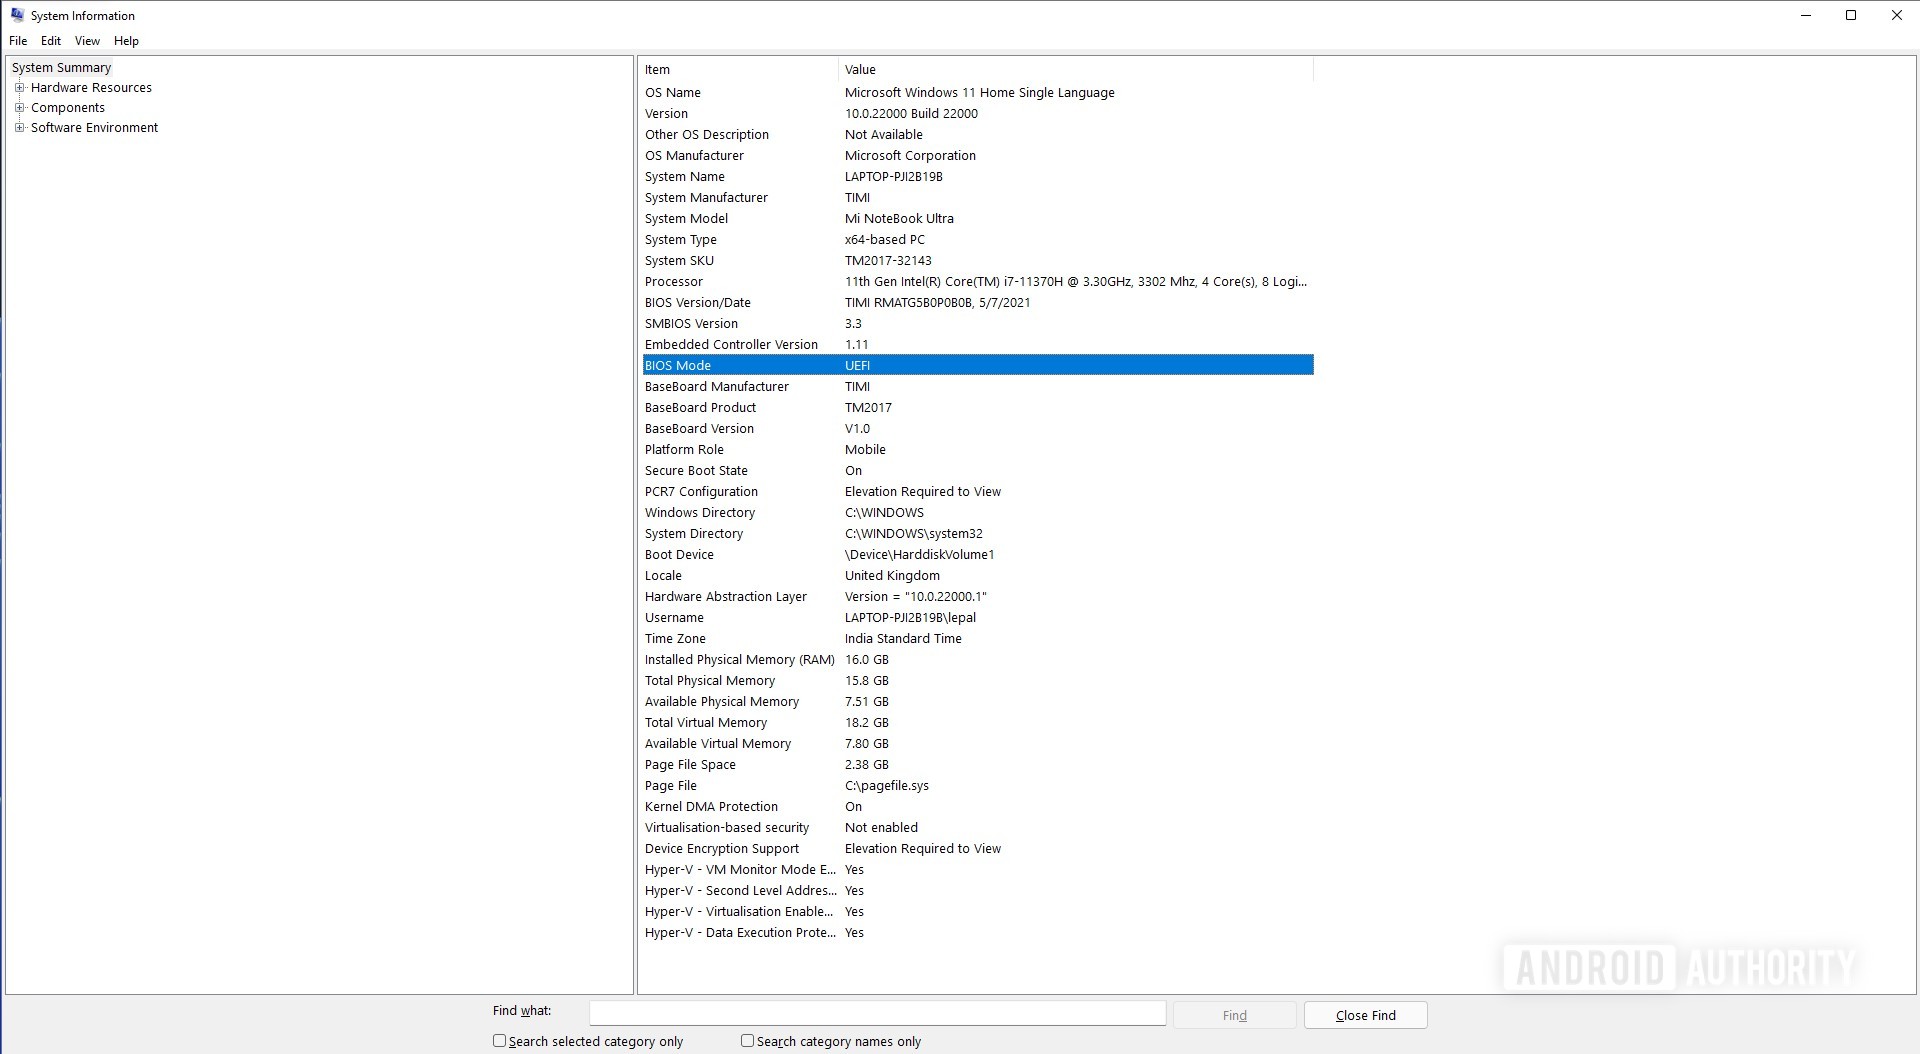
Additionally, you will also need to check your boot system type in Windows. Open the System Information app by searching for msinfo in your Start Menu. Click on System Summary in the left pane, and check what your BIOS Mode says. It should be BIOS or UEFI.

Palash Volvoikar / Android Authority
This method will require you to have a USB drive that is at least 8GB in size. You will be creating a bootable USB drive using an official Windows 11 ISO and a bootable creator app called Rufus.
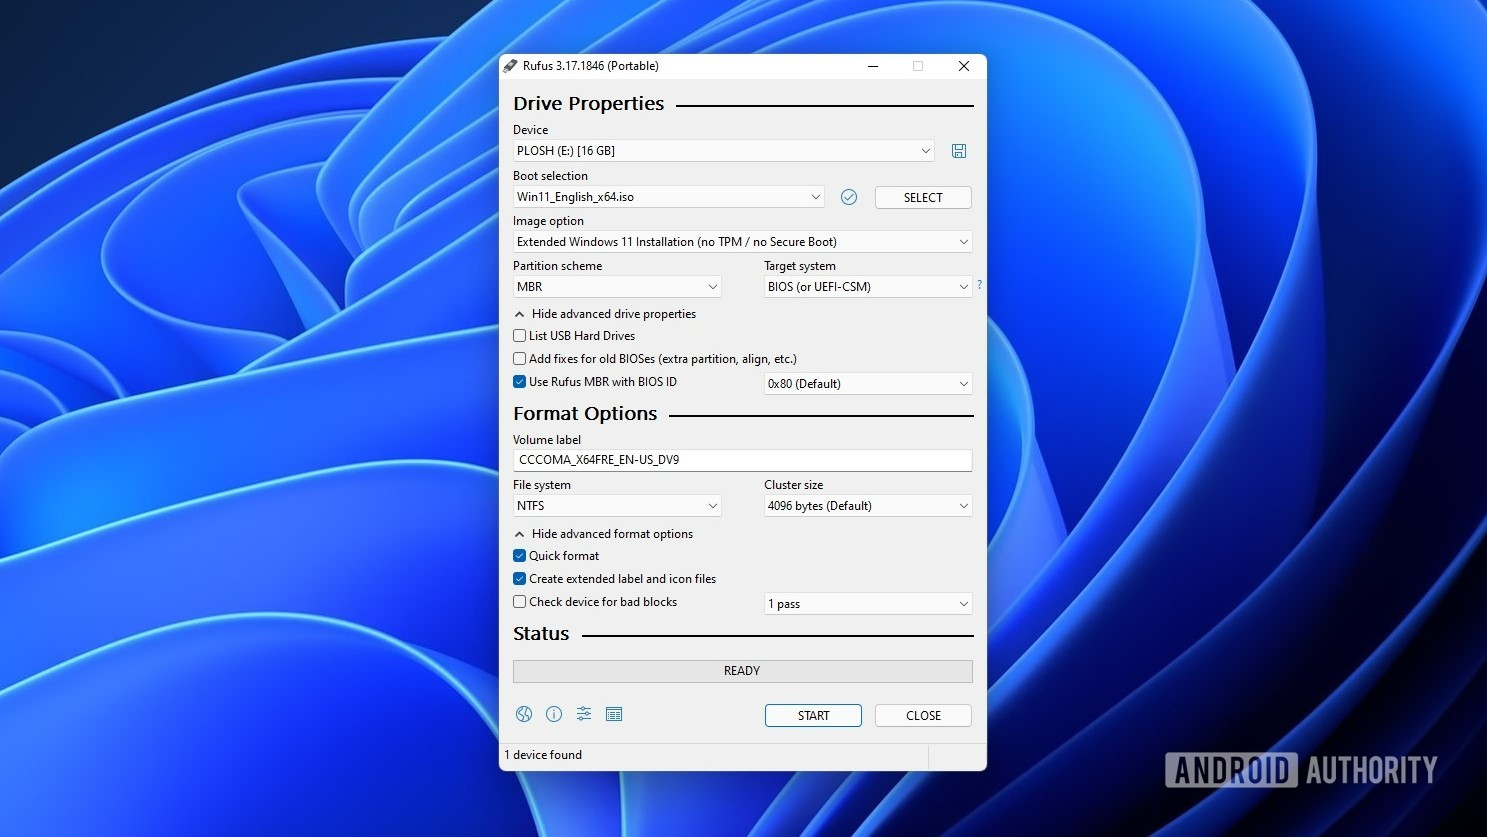
- Download the latest version of Rufus from here. You can pick the portable version if you want a one-click experience.
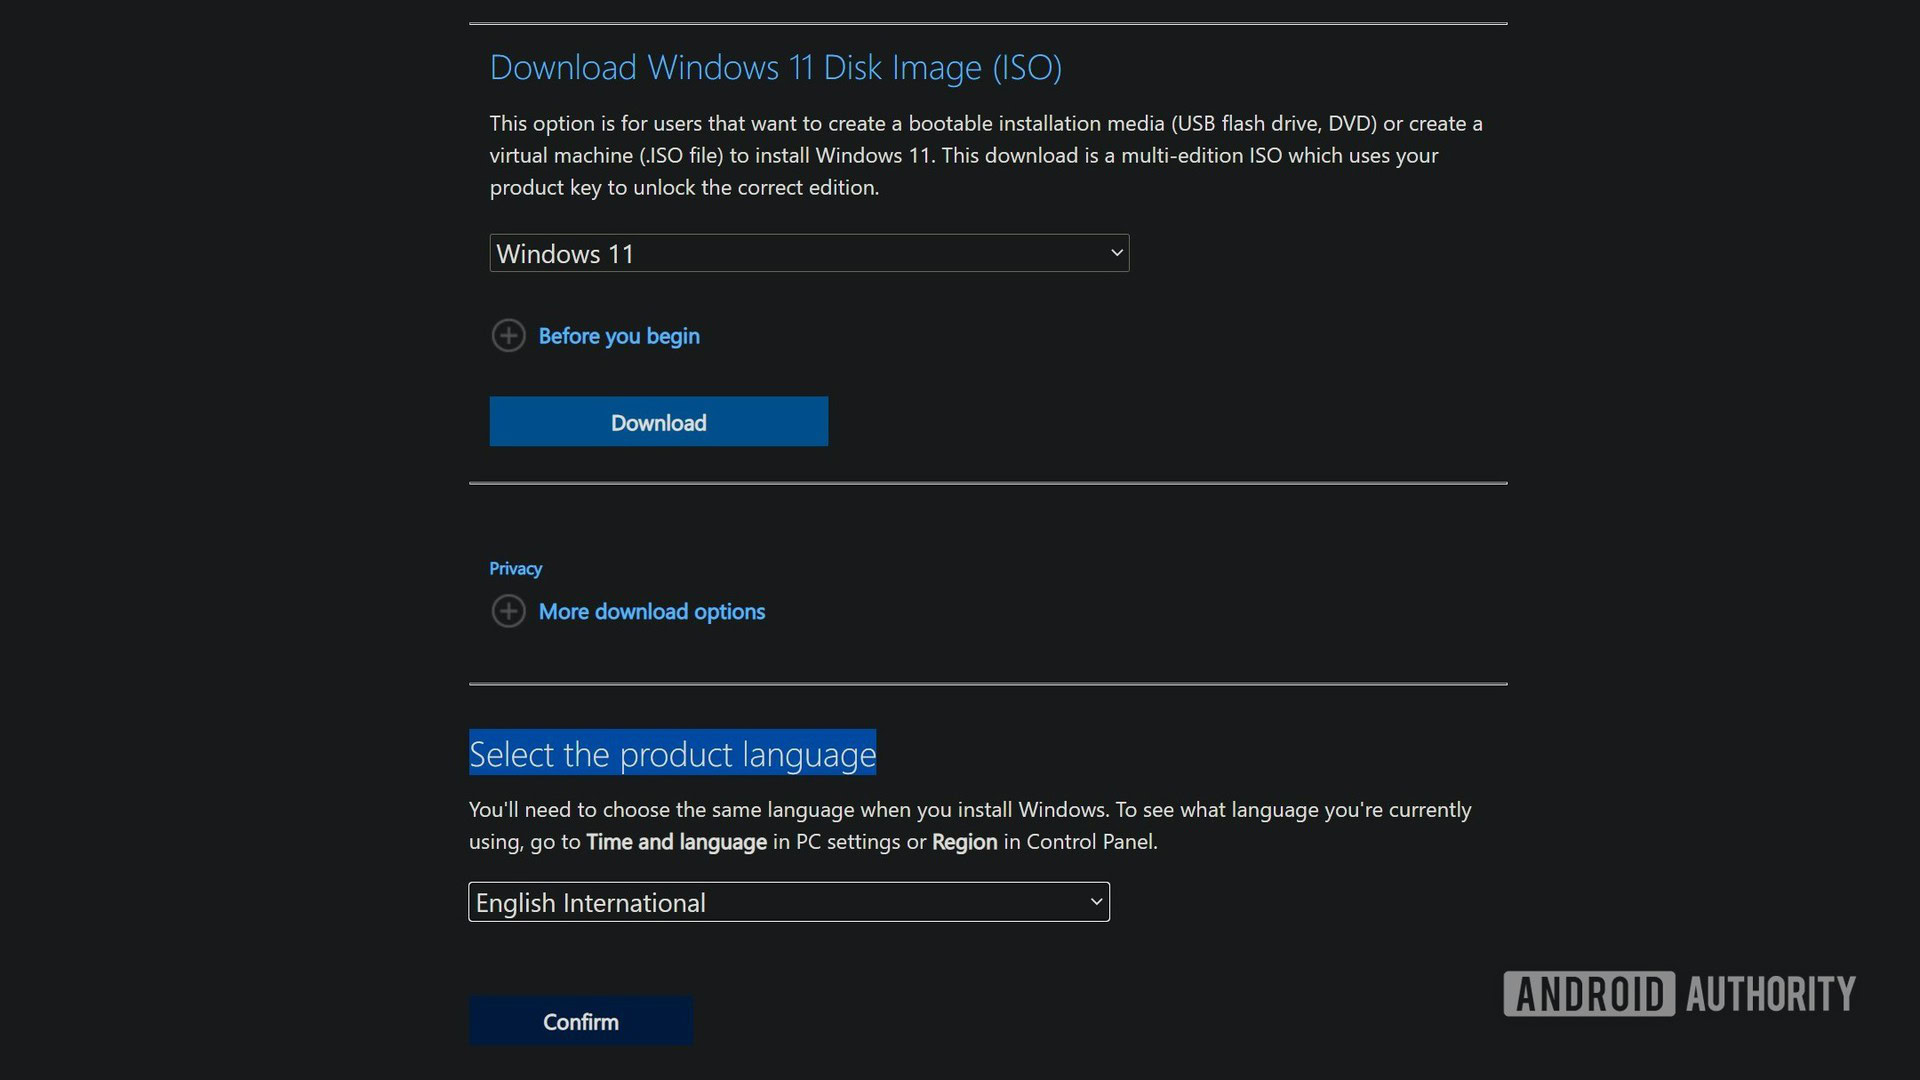
- Head over to the official website for Windows 11 ISO download.
- Under the Download Windows 11 Disk Image (ISO) section, click on Select Download, and select Windows 11. Click on the blue Download button.
- This will prompt you to select the language for your ISO. Under the Select the product language section, click on Choose one. Pick your preferred language from the dropdown, and click on Confirm. The download will begin.

Palash Volvoikar / Android Authority

Palash Volvoikar / Android Authority
- Click on Start to create the bootable USB. It will take some time to write the files to the USB drive. You will see a confirmation when the process is complete.
The rest of the process is just like any regular old bootable USB installation. Attach the USB drive to the system you want to upgrade to Windows 11, and boot it up. You can now boot into the Windows 11 bootable USB by bringing up your Boot device menu by pressing the boot options key specific to your system. It’s usually the Delete key or one of the function keys. You can look up the key binding specific to your system. Once the boot device menu shows up, select the USB drive, and follow the Windows 11 installation setup.
More here: How to run Android apps on Windows 11
Using Windows 11 on unsupported hardware
Like we mentioned earlier, this is a stripped-down version of Windows 11. While it doesn’t take away too many components, the components that do get removed could potentially cripple support for current or future features in the OS. Microsoft is already taking away Windows Update support, and it could take away more things in the future.
Also read: Windows 11 beta impressions
That being said, this is still a solid way to get Windows 11 to breathe new life into an aging system. This is especially true if you have an older system that lacks TPM since this method will let you install Windows 11 without TPM. Just be prepared to have a few features be wonky. We will be updating this guide with better ways to install Windows 11 on unsupported hardware, so stay tuned for more.
https://ift.tt/3bLIgDN
Technology
Bagikan Berita Ini


0 Response to "How to install Windows 11 on unsupported hardware - Android Authority"
Post a Comment